How to Create Brand-Compliant Visuals with Drag-and-Drop
Creating brand-consistent visuals no longer requires hours of manual effort or expensive designers. With drag-and-drop tools like IllustrationsAI, you can streamline the process while ensuring every design aligns with your brand consistency checklist. Here’s how it works:
- Centralize Your Brand Assets: Organize logos, color palettes, and typography into a single hub for easy access.
- Leverage AI for Consistency: Train the AI with 10–20 reference images to replicate your brand’s style (e.g., colors, shapes, textures).
- Choose and Customize Styles: Select predefined illustration styles like Flat 2D or 3D, and tweak them to match your brand personality.
- Generate and Edit Visuals: Use AI prompts to create visuals, then refine them with drag-and-drop tools for precise placement.
- Export in Multiple Formats: Save visuals in SVG, PNG, JPG, and more, ensuring compatibility across digital and print platforms.
- Maintain Consistency Across Channels: Use templates and shared workspaces to keep your team aligned and your visuals consistent.
Key Stats: Consistent branding can increase revenue by 23%, while inconsistent branding costs businesses an average of $2.1 million annually. Tools like IllustrationsAI save time, reduce costs, and help meet consumer expectations for uniform brand experiences.
This guide explains how to simplify visual creation, maintain brand standards, and improve efficiency using AI-powered tools.
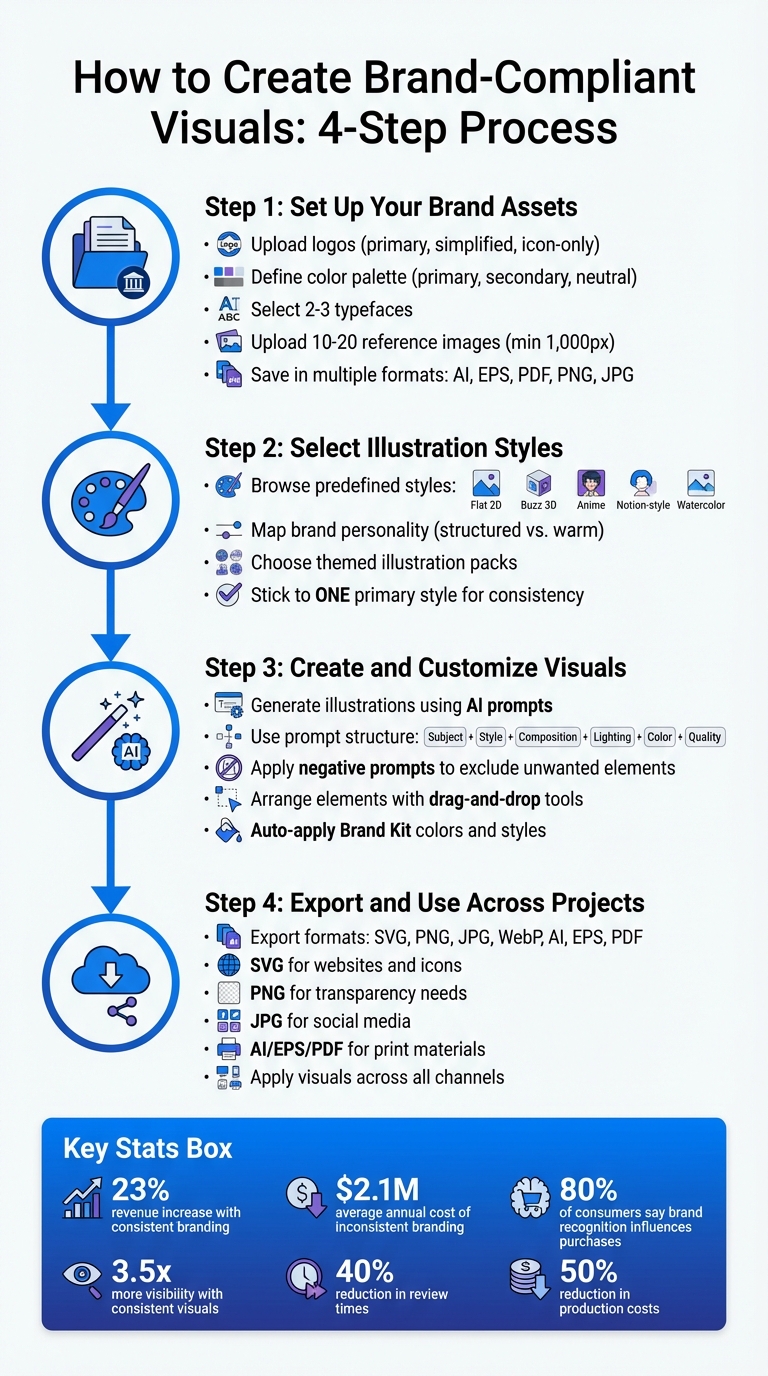
4-Step Process to Create Brand-Compliant Visuals with AI
Step 1: Set Up Your Brand Assets
Before diving into creating visuals, you need a centralized brand library. This will serve as the go-to hub for all approved design elements, ensuring consistency and preventing outdated or off-brand materials from slipping through the cracks. Once your brand assets are organized, you’re ready to create visuals that align perfectly with your identity.
Upload Your Brand Materials
Start by collecting all versions of your logo - primary, simplified, and icon-only - formatted for both print and web. Make sure you have variations for different backgrounds, including full-color, monochrome, and inverse options. Your color palette should include:
- Primary colors: One to three core shades.
- Secondary colors: Two to four accent shades.
- Neutral tones: Black, white, and gray for backgrounds and text.
For typography, select two or three typefaces with clear font weights and a hierarchy that distinguishes headlines from body text.
If you're using IllustrationsAI, upload 10–20 reference images (minimum 1,000 pixels wide or tall) to train the AI on your brand’s visual style. These images should reflect your brand’s colors, textures, and composition. Save logos in vector formats (AI, EPS, PDF) for scalability and web-friendly formats (PNG, JPG) for digital use. Document your colors in HEX for web, RGB for screens, CMYK for print, and Pantone for professional printing to ensure accuracy across mediums.
Create Your Brand Style
After uploading your assets, IllustrationsAI will generate a custom style tailored to your brand. It analyzes details like stroke weight, corner radii, and hex codes from your reference images. By setting baseline specifications (e.g., "2px strokes, 4px corners") and negative prompts (e.g., "no gradients"), the AI ensures every illustration follows your brand guidelines. This built-in consistency means all future drag-and-drop designs will align seamlessly with your visual identity.
Step 2: Select Illustration Styles and Packs
Once your brand assets are sorted, it's time to define a visual style that reflects your identity. A consistent illustration style not only enhances your brand's story but also ensures a polished and unified look across all your visuals. While the subject of an illustration communicates what your brand does, the style reveals the personality behind it. This subtle yet powerful distinction shapes how people perceive your brand, often before they even read a single word.
Browse Ready-Made Styles
IllustrationsAI provides a variety of predefined styles, including Flat 2D, Buzz 3D, Anime, Notion-style, Google-style, Ghibli, and Watercolor. Each of these styles conveys a specific vibe. For example:
- Isometric or 3D styles: Ideal for brands like SaaS platforms or technical products. These styles can make complex workflows or web sections feel immersive and professional.
- Hand-drawn or colorful styles: Perfect for brands in lifestyle or social media spaces, creating a warm, playful, and approachable feel.
"The subject says what you do; the style says who you are." - GetIllustrations
To choose the right style, consider mapping your brand's personality on axes like structured vs. warm or text-heavy vs. visually focused. For instance, a fintech app with detailed dashboards might benefit from clean Flat 2D visuals, while a creative agency targeting younger audiences could lean toward Anime for its energetic and storytelling-driven aesthetic.
Keep in mind: Mixing multiple style families can create confusion and weaken your brand’s identity. Stick to one primary style and ensure your color palette stays consistent.
Modify Illustration Packs
After selecting a primary style, you can refine it further by choosing themed illustration packs that align with your brand’s visual language. These packs are designed to maintain consistency across various projects - whether it’s for website graphics, social media posts, or email campaigns.
IllustrationsAI’s packs follow a unified set of design rules, ensuring that every illustration fits seamlessly into your overall style. You can also tweak these packs to match your brand’s specific needs. For example, you might emphasize bold focal points or unique layouts to help the AI replicate your style across all outputs. This level of customization ensures your visuals stay cohesive, no matter the platform or project.
Step 3: Create and Customize Your Visuals
Now that you've gathered your brand assets and fine-tuned your illustration packs, it's time to bring your visuals to life. This part blends AI-generated designs with hands-on tweaks, helping you craft illustrations that feel tailored to your brand while keeping the process efficient.
Generate Illustrations Using AI
With IllustrationsAI, you can create custom visuals by either entering detailed prompts or uploading reference images. The platform generates royalty-free illustrations in formats like SVG, PNG, JPG, WebP, AI, and EPS, all with commercial-use rights. To get the most polished results, try structuring your prompts like this: Subject + Style + Composition + Lighting/Rendering + Key Details/Color Palette + Quality. For example, instead of a vague "person at desk", go with something like: "professional woman at laptop, Flat 2D style, centered composition, natural lighting, navy blue and coral palette, high detail."
You can also use negative prompts to exclude unwanted elements. Phrases like "no text", "no logos", or "no clutter" help the AI stay aligned with your brand's aesthetic. For added consistency, train the AI on 10–20 brand-specific images. Once trained, the platform will automatically apply your brand’s colors, textures, and compositions to every visual it generates. This saves time and ensures every piece fits seamlessly into your overall style.
Here’s a pro tip: use the Anchor Icon Method. Start by creating one perfect illustration, then base all future prompts on its description. This approach helps maintain a unified look across all your visual projects.
By combining AI generation with manual customization, you can establish a cohesive visual identity without overcomplicating the process.
Arrange Elements with Drag-and-Drop
Once your illustrations are ready, fine-tune their placement using drag-and-drop tools. These intuitive features allow you to resize and move elements while preserving proportions and details. For instance, if you're placing a product illustration next to some text, the AI can adjust lighting, shadows, and reflections to ensure everything looks cohesive.
To stay consistent with your brand, these tools automatically pull colors and styles from your Brand Kit. This eliminates any guesswork about which shade of blue or font size to use. You can also use visual anchoring - placing spot illustrations next to text blocks - to boost readability and replace traditional bullet points. This technique works wonders on landing pages or social media graphics where grabbing attention is key.
For even more precision, incorporate structured prompt templates like "2px stroke, 4px corner radius." These design rules ensure that every icon, button, or graphic element aligns perfectly with your brand’s design system, no matter who’s working on the project.
Step 4: Export and Use Visuals Across Projects
Once your custom visuals are ready, it’s time to export them in the right formats for various marketing channels. IllustrationsAI gives you the flexibility to export in formats like SVG, PNG, JPG, WebP, AI, and EPS, making it easy to adapt your designs for both digital and print. The key is to match the format to its intended use. For example, SVG works best for website icons and logos because it scales perfectly and loads quickly. On the other hand, JPG is ideal for standard social media images, while PNG is perfect when transparency is required. For print materials like brochures or business cards, stick with PDF, AI, or EPS to maintain high resolution and preserve fonts.
Export in Different File Formats
Choosing the correct file format is critical to ensure your visuals perform well across platforms. For digital use, SVG files are lightweight and scalable, making them perfect for high-resolution screens. WebP is another great option for websites, offering excellent compression that speeds up page loading without sacrificing quality. To keep your web-based files efficient, aim for sizes under 200KB to avoid slowing down your site. For print, AI and EPS are must-haves since they are vector-based and maintain sharpness at any size. When preparing files for professional printing, use CMYK or Pantone color systems. For digital screens, switch to RGB or HEX codes to ensure accurate colors.
Here’s a quick guide to file formats:
| Format | Best Use Case | Key Characteristics |
|---|---|---|
| SVG | Websites, Icons, Logos | Scalable without quality loss; lightweight for fast loading. |
| PNG | Marketing, Social Media | Lossless compression; supports transparency for layering. |
| JPG | Social Media, Web | Standard web format; retains color with lossy compression. |
| WebP | Modern Websites | High compression for faster page loads; maintains quality. |
| AI / EPS | Master Files, Print | Vector-based; essential for professional printing and scalability. |
| Print Materials | Preserves layout, fonts, and high-resolution images for printing. |
By exporting your visuals in the proper format, you ensure seamless integration across all your projects.
Apply Visuals Across Channels
After exporting, it’s time to put your visuals to work across websites, blogs, social media, presentations, and email campaigns. Maintaining consistency is crucial - 80% of consumers say brand recognition influences their purchasing decisions. To stay organized, use clear file naming conventions like icon-[category]-[name]-[variant].svg so your team can quickly find what they need. Proper naming also ensures uniformity across platforms. Don’t forget to include descriptive alt text for accessibility, and if a platform doesn’t support your primary brand font, use web-safe alternatives like Arial or Helvetica.
"Brands don't need another PDF. They need a living guide that shows people not just what the brand looks like, but how to use it the right way." - Edward Boatman, CEO & Co-Founder, Lingo
Store your approved assets in a centralized cloud hub to ensure everyone on your team has access to the latest versions. This approach eliminates the risk of outdated or off-brand visuals being used. Plus, when you update a master file in the hub, it syncs automatically across websites and email campaigns, saving time and reducing mistakes. To make it easier for non-designers to create on-brand content, consider setting up templates with locked brand elements. This ensures consistency while empowering your team to produce high-quality materials efficiently.
How to Maintain Brand Consistency
Staying consistent with your brand visuals isn’t just a matter of aesthetics - it’s about building trust and driving results. Research shows that consistent brand presentation can boost revenue by up to 23%, while brand recognition improves by 80% when companies maintain visual uniformity. On the flip side, inconsistent branding can cost businesses an average of $2.1 million annually in missed opportunities. Keeping your branding cohesive not only strengthens your identity but also protects your bottom line.
Use Templates to Save Time
Templates are a game-changer when it comes to staying on-brand. By creating a centralized library of templates in tools like IllustrationsAI, you ensure all teams work with the same updated assets. This eliminates the risk of using outdated or mismatched visuals. You can even encode specific design standards - think "2px stroke weight, 4px corner radius" - into prompt templates, so every AI-generated visual aligns with your brand’s "visual DNA".
To take it a step further, preset negative prompts can help exclude elements that don’t fit your brand guidelines. This proactive approach minimizes the need for revisions and streamlines the approval process, saving both time and effort.
Work Better with Your Team
Collaboration is key to maintaining brand consistency, and shared workspaces are a great way to keep everyone on the same page. With IllustrationsAI’s shared brand kits, your team can access standardized prompt libraries and style settings, ensuring a unified output across all projects. This is especially helpful for non-designers who need to produce visuals without constant input from the design team.
Real-time commenting and feedback systems can further improve workflows by speeding up revisions and ensuring changes are made in context. For teams juggling multiple platforms, AI tools can automatically adapt templates for different channels, like resizing visuals for Instagram or LinkedIn, while keeping the core brand elements intact. With a drag-and-drop interface and locked templates featuring pre-approved brand elements, everyone can create confidently without risking off-brand designs.
Let AI Learn Your Brand Style
The more you use AI tools like IllustrationsAI, the better they get at replicating your brand’s look and feel. Once trained on your reference images, the AI learns your aesthetic and applies it consistently across a variety of outputs without the need for manual adjustments. This allows you to generate new scenes, poses, and compositions that align perfectly with your established style.
Advanced features ensure that key brand assets - like labels, textures, and signature design elements - remain accurate and recognizable in every generated visual. Whether you’re working on product mockups or Flat 2D character illustrations, the AI keeps everything proportional and in line with your brand identity. Over time, the system learns from your approvals and rejections, creating a feedback loop that makes each new generation of visuals even more aligned with your brand. This ensures your visuals stay consistent, no matter the project.
Conclusion
To wrap things up, the drag-and-drop approach ensures your visuals stay true to your brand’s identity without the hassle of endless revisions or reliance on uninspired stock images. Tools like IllustrationsAI allow you to upload your brand assets, create AI-driven illustrations, and tailor them to your exact needs - all while maintaining the consistent look that resonates with your audience. The stats back this up: 80% of consumers say brand recognition impacts their purchasing decisions, and brands with consistent visuals across platforms enjoy 3.5 times more visibility.
As covered earlier, specialized tools help maintain a cohesive visual language across projects, preventing "style drift" that can weaken your brand’s message. These tools adapt to your brand style over time, ensuring each new illustration fits seamlessly into your established aesthetic, eliminating the confusion caused by mismatched visuals.
AI-powered platforms also streamline workflows, cutting review times by 40% and reducing production costs by 50%. With 90% of consumers expecting a consistent brand experience, these tools go beyond convenience - they’re essential for staying competitive.
From social media posts to marketing campaigns and e-commerce visuals, combining AI generation with drag-and-drop customization lets you scale production without sacrificing quality. Pricing options start at $36 per month for the Hobby plan, with the Business plan offering up to 1,500 AI illustrations for $596 per month. This flexibility means you can choose a plan that fits your team’s needs while ensuring your visuals consistently build trust and recognition.
Leverage these tools to create polished, brand-aligned visuals for every project. Consistency has never been easier - or more impactful.
FAQs
To align AI illustration tools with your brand's style, start by uploading 10 to 20 high-quality reference images. These images should showcase your brand's distinct style, preferred color palette, and overall design aesthetic. This step helps the tool produce results that are both accurate and consistent with your brand identity.
AI prompts for creating on-brand illustrations should provide clear and detailed instructions that align with your brand’s style, colors, and overall identity. To achieve this, focus on:
- Defining your color palette, preferred artistic styles, and key themes.
- Including specific details about the tone or mood of the illustration.
- Uploading reference images to give the AI a visual starting point.
By setting structured parameters and offering explicit guidance tailored to your brand’s standards, you can ensure the resulting visuals stay consistent with your guidelines. This approach helps maintain a unified look across all projects.
For web use, export visuals in SVG, PNG, or JPG formats to ensure quick loading times and compatibility across digital platforms. For print, opt for SVG or AI formats to maintain high resolution and scalability without compromising detail.
- Web formats: SVG, PNG, JPG
- Print formats: SVG, AI